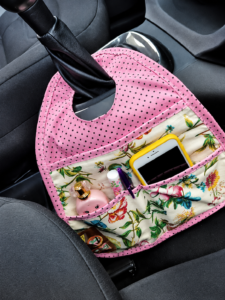
Here is a complete, step-by-step DIY pattern and sewing guide for a Car Gear Shift Organizer (also known as a gear shift pocket or caddy). This handy organizer slips right over your automatic or manual gear shift console to hold your sunglasses, phone, pens, lip balm, and receipts within arm’s reach.
1. Materials & Supplies Needed
-
Main Fabric (Exterior): $1/2$ yard of a sturdy fabric like canvas, denim, duck cloth, or outdoor upholstery fabric.
-
Lining Fabric: $1/2$ yard of quilting cotton or lightweight nylon.
-
Interfacing: $1/2$ yard of fusible fleece (Pellon 987F) or heavy fusible interfacing (Pellon SF101) to give the pockets structure.
-
Elastic: 6 inches of $1/4″$-wide elastic (optional, for securing mesh pockets).
-
Basic Sewing Tools: Scissors, fabric marker, pins or Wonder Clips, coordinating heavy-duty thread, and a sewing machine needle (size 90/14 recommended for canvas/denim).
2. Fabric Cutting Dimensions
Cut the following pieces from your Main Fabric, Lining Fabric, and Interfacing:
The Main Body Panel (The Base)
-
Main Fabric: Cut (2) $8″ \times 12″$ rectangles
-
Fusible Interfacing: Cut (2) $8″ \times 12″$ rectangles
The Large Lower Pocket
-
Main Fabric: Cut (1) $8″ \times 7″$ rectangle
-
Lining Fabric: Cut (1) $8″ \times 7″$ rectangle
-
Fusible Interfacing: Cut (1) $8″ \times 7″$ rectangle
The Small Front Pocket (For pens/sunglasses)
-
Main Fabric: Cut (1) $8″ \times 5″$ rectangle
-
Lining Fabric: Cut (1) $8″ \times 5″$ rectangle
-
Fusible Interfacing: Cut (1) $8″ \times 5″$ rectangle
3. Step-by-Step Construction Guide
Step 1: Prep and Interface
-
Iron the fusible interfacing/fleece to the wrong side of all corresponding Main Fabric pieces (the two body panels and the two pocket pieces).
Step 2: Create the Gear Shift Opening (The Hole)
To hang the organizer, you need a cutout near the top of the main body panel.
-
Take one $8″ \times 12″$ Main Body piece and fold it in half lengthwise to find the center.
-
Measure 2 inches down from the top edge along that center fold.
-
Draw a circle with a 3-inch diameter (you can trace a large jar lid or a wide-mouth glass).
-
Cut out the circle through the folded fabric. Unfold it; you now have a hole near the top.
-
Place this piece over your second $8″ \times 12″$ Main Body piece and your two Lining pieces, trace the circle, and cut the hole out of all of them so they match perfectly.
Step 3: Assemble the Pockets
-
Small Front Pocket: Place the $8″ \times 5″$ Main piece and Lining piece Right Sides Together (RST). Sew along the top $8″$ edge using a $1/4″$ seam allowance. Turn it right side out, press flat, and topstitch $1/8″$ from the finished edge.
-
Large Lower Pocket: Repeat the exact same process with the $8″ \times 7″$ Main and Lining pieces (sew top edge, turn, press, topstitch).
Step 4: Layer and Divide the Pockets
-
Lay one of your cut-out Main Body pieces flat on your table, right side facing up.
-
Place the Large Lower Pocket on top, aligning the bottom and side raw edges. Pin or clip in place.
-
Place the Small Front Pocket directly on top of the large pocket, aligning the bottom and side raw edges. Pin in place.
-
Sew Compartment Dividers: Use a fabric marker and a ruler to draw a vertical line down the center of the pockets (or offset it if you want one wide pocket for a phone and one narrow pocket for pens).
-
Stitch directly down your marked line, sewing through the Small Pocket, Large Pocket, and Main Body base. Make sure to backstitch securely at the top of the pocket edges to prevent ripping.
-
Baste stitch around the raw left, right, and bottom edges ($1/8″$ seam allowance) to lock all the pocket layers to the main body.
Step 5: Put It All Together
-
Take your other $8″ \times 12″$ Main Body piece (the back panel) and place it face down (RST) over the pocket/body assembly you just made.
-
Sew down the left side, across the bottom, and up the right side using a $3/8″$ seam allowance. Leave the top flat edge completely unsewn.
-
Repeat this step for the two Lining pieces: Place them RST, sew the left, bottom, and right sides, but leave a 3-inch opening at the bottom edge for turning the bag later.
Step 6: Finisihing the Gear Shift Hole
-
Turn the exterior fabric shell right-side out. Keep the lining shell wrong-side out.
-
Slip the exterior shell inside the lining shell so that their right sides are touching.
-
Align the circular cutouts carefully and pin or clip the raw edges of the circles together.
-
Sew completely around the inside of the circle cutout using a $1/4″$ seam allowance.
-
Pro Tip: Clip small triangular notches into the seam allowance all the way around the circle (being careful not to cut your stitches). This allows the fabric to curve smoothly without bunching.
Step 7: The Final Turn
-
Reach through the 3-inch gap you left in the bottom of your lining and pull the entire organizer right-side out through the hole.
-
Push the lining down inside the organizer through the circular gear shift hole. Use a chopstick or turning tool to push out the bottom corners sharply.
-
Tuck the raw edges of the lining gap inside and topstitch it closed with a tight $1/16″$ seam.
-
Press the entire organizer flat with an iron. Topstitch $1/8″$ all the way around the inside of the circular gear shift opening to hold the lining firmly in place.
💡 Installation Tip
Simply slide the circular opening down over your car’s gear shift lever. The pockets will hang down against the side of the center console. If your console tapers sharply and the organizer slides around, you can stitch a small piece of adhesive-backed Velcro to the back of the organizer and stick the matching piece to your car’s plastic console to lock it perfectly in place!