ck Measurements
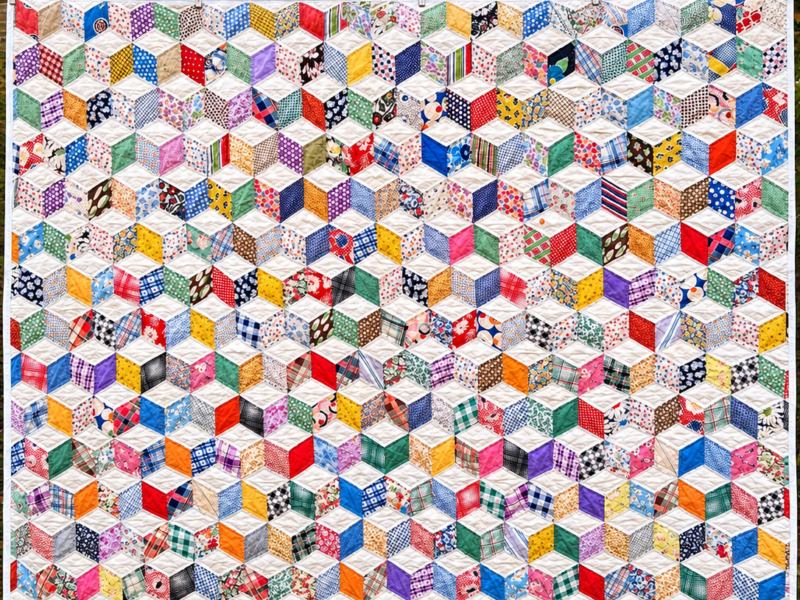
For this tutorial, we will use a 4 x 4 block layout, similar to the arrangement shown in the photograph.
The measurements below create a quilt top measuring approximately 48 x 48 inches before quilting and binding.
Each finished block will measure 12 x 12 inches.
| Quilt Component | Measurement |
|---|---|
| Finished block | 12 x 12 inches |
| Unfinished block | 12½ x 12½ inches |
| Number of blocks | 16 |
| Strips per block | 4 |
| Strip cutting size | 3½ x 12½ inches |
| Finished quilt top | 48 x 48 inches |
These measurements include a ¼-inch seam allowance.
You can easily increase the quilt size by making additional blocks.
Step 1: Organize and Prepare Your Fabrics
Start by separating your fabrics into five color groups: turquoise, yellow, purple, green, and coral.
For each color group, select four coordinating fabrics.
Lay the fabrics side by side to check how the shades work together.
Try to include:
- One light fabric.
- One medium shade.
- One darker fabric.
- One patterned fabric.
This combination will help create the beautiful striped effect seen in the inspiration quilt.
Press all fabrics before cutting to remove wrinkles and ensure accurate measurements.
Step 2: Cut the Fabric Strips
Using your rotary cutter, quilting ruler, and cutting mat, cut four strips for each block.
For the block measurements used in this tutorial, cut each strip:
3½ inches wide x 12½ inches long.
You will need four strips for every block.
Since the quilt has 16 blocks, you will need:
- 16 blocks.
- 64 fabric strips.
- 4 strips per block.
Organize the strips into their respective color groups.
Keep each set together so you can easily assemble the blocks without mixing up the color combinations.
Important: Accurate cutting is essential for this project. Make sure all strips have the same length and width.
Step 3: Sew the Strips Together
Now it is time to begin creating your Rail Fence blocks.
Take four strips from the same color group.
Arrange them side by side, experimenting with the order of the shades and prints.
For example, a turquoise block might be arranged like this:
- Light aqua.
- Medium turquoise.
- Dark teal.
- Printed light blue.
Place the first two strips together with their right sides facing each other.
Sew along the long edge using a ¼-inch seam allowance.
Open the fabric and press the seam.
Next, attach the third strip to the second strip, again with right sides facing each other.
Press the seam.
Finally, sew the fourth strip to the third strip.
You should now have one long rectangular panel consisting of four parallel fabric strips.
Repeat this process for all 16 blocks.
Step 4: Press the Seams Carefully
Pressing is an important part of successful patchwork sewing.
After sewing each strip, use your iron to flatten the seam.
You can press the seams toward the darker fabric to reduce the visibility of the seam allowances.
Alternatively, you can press alternating seams in opposite directions to help the pieces nest together when assembling larger sections.
Avoid stretching the fabric while pressing.
A well-pressed strip-pieced panel will be easier to measure, trim, and sew into the finished quilt.
Step 5: Trim the Blocks to the Correct Size
Once all four strips have been sewn together, place the panel on your cutting mat.
Use your quilting ruler and rotary cutter to trim the edges.
Each block should measure:
12½ x 12½ inches unfinished.
Make sure the edges are straight and the corners are square.
This measurement is important because it allows all the blocks to fit together evenly.
Repeat the trimming process for every color block.
You should now have 16 completed Rail Fence blocks.
Step 6: Arrange the Blocks to Create the Colorful Design
This is one of the most enjoyable stages of the project.
Before sewing the blocks together, arrange them on a large flat surface, such as a design wall, table, or clean floor.
To recreate the inspiration photograph, use a repeating diagonal color arrangement.
Here is a suggested layout:
| Row | Block 1 | Block 2 | Block 3 | Block 4 |
|---|---|---|---|---|
| 1 | Turquoise | Yellow | Purple | Green |
| 2 | Coral | Turquoise | Yellow | Purple |
| 3 | Green | Coral | Turquoise | Yellow |
| 4 | Purple | Green | Coral | Turquoise |
This arrangement creates a beautiful diagonal rainbow effect.
Pay attention to the direction of the fabric strips.
In the inspiration quilt, the strips change orientation between neighboring sections, creating additional visual movement.
You can reproduce this effect by rotating selected blocks 90 degrees before joining them.
Experiment with the placement until you achieve a balanced composition.
Design tip: Take a photograph of your layout before sewing. This will help you remember the correct block positions.
Step 7: Sew the Blocks into Rows
Once you are happy with the arrangement, begin joining the blocks.
Start with the first row.
Place the first and second blocks together with their right sides facing each other.
Align the edges carefully and sew using a ¼-inch seam allowance.
Press the seam.
Attach the third block, followed by the fourth block.
Repeat the same process for the remaining three rows.
You should now have four horizontal rows, each containing four blocks.
Check that the rows are the same length before moving to the next step.
Step 8: Join the Rows Together
Place the first row on top of the second row, with right sides facing each other.
Align the seams and pin the edges.
Sew along the entire length using a ¼-inch seam allowance.
Press the seam.
Continue joining the third and fourth rows.
When all four rows are connected, you will have a complete quilt top measuring approximately 48½ x 48½ inches unfinished.
Give the entire quilt top a final press.
Check the seams and trim any loose threads.
Step 9: Prepare the Quilt Sandwich
With the quilt top completed, it is time to prepare the layers for quilting.
You will need three layers:
- Quilt top: Your finished colorful Rail Fence patchwork.
- Batting: The soft middle layer that gives the quilt warmth and thickness.
- Backing fabric: The fabric used on the reverse side of the quilt.
Place the backing fabric on a flat surface with the wrong side facing up.
Add the batting on top, followed by the quilt top with the right side facing up.
Smooth all three layers carefully to remove wrinkles.
Use safety pins, quilting clips, or temporary fabric adhesive to hold the layers together.
Make sure the backing and batting are slightly larger than the quilt top.
Step 10: Quilt and Finish Your Project
Now you can quilt the three layers together.
For this colorful Rail Fence design, simple straight-line quilting works beautifully.
You can sew parallel lines along the seams between the fabric strips or create additional diagonal quilting lines.
Another option is to quilt around each block to emphasize the geometric arrangement.
Once quilting is complete, trim the excess batting and backing fabric.
Prepare your binding strips, sew them together, and attach the binding around the edges of the quilt.
Fold the binding over to the back and finish by hand or machine.
Your colorful Rail Fence quilt is now complete!
Creative Ideas for Using This Quilt Pattern
One of the best things about the Rail Fence design is its versatility.
By changing the colors, block sizes, and strip arrangements, you can create completely different quilt designs using the same basic technique.
Here are some project ideas:
Rainbow Baby Quilt: Use soft pastel fabrics to create a cheerful and colorful baby quilt.
Modern Bed Quilt: Choose coordinated shades of blue, green, gray, or beige for a contemporary bedroom.
Scrap Fabric Quilt: Use leftover quilting cotton from previous projects to create a colorful patchwork design.
Seasonal Quilt: Combine warm autumn colors, Christmas fabrics, or spring-inspired prints.
Decorative Throw: Make a smaller version using fewer blocks for a cozy sofa blanket.
Helpful Tips for a Beautiful Rail Fence Quilt
- Always prewash your fabrics if your fabric collection requires it.
- Use a consistent ¼-inch seam allowance throughout the project.
- Press seams carefully after each sewing step.
- Choose fabrics with coordinated colors but different patterns.
- Keep your strips accurately measured.
- Arrange all blocks before sewing them together.
- Rotate selected blocks to create additional visual interest.
- Use a walking foot when quilting multiple fabric layers to help prevent shifting.
Final Thoughts
The Rail Fence Quilt Pattern is a wonderful example of how simple fabric strips can become a beautiful and eye-catching patchwork design.
Its straightforward construction makes it suitable for beginners, while its endless color and layout possibilities make it equally enjoyable for experienced quilters.
The inspiration quilt demonstrates how combining turquoise, yellow, purple, green, and coral fabrics can create a cheerful rainbow arrangement with a modern geometric appearance.
Whether you are making a cozy throw, a colorful bed quilt, or a handmade gift, this strip-pieced design is a fantastic way to explore color, use coordinated fabric collections, and enjoy the creative process of quilting.
Gather your favorite fabrics, prepare your sewing machine, and start creating your own beautiful Rail Fence quilt!