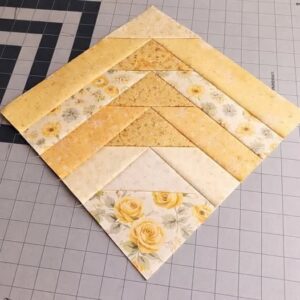
The Chicago Geese Quilt Block is a stunning, dynamic block that combines elements of a Log Cabin and Flying Geese. While it looks intricate and complex, it is built sequentially from the center outward, making it incredibly beginner-friendly.
Here is the step-by-step pattern to create a 12-inch finished block.
Fabric Cutting Requirements
To get the traditional scrappy yet controlled look, you will need a central background/accent pair and four coordinating colors for the outer rounds.
-
Fabric A (White/Background): Cut (1) $5″ \times 5″$ square
-
Fabric B (Pink/Center Accent): Cut (1) $5″ \times 5″$ square
-
Fabric C (Dark Aqua/Geese Triangles): Cut (4) $4.5″ \times 4.5″$ squares
-
Fabric D (Light Gold):
-
Cut (1) $2.5″ \times 4.5″$ rectangle
-
Cut (1) $2.5″ \times 6.5″$ rectangle
-
-
Fabric E (Light Aqua):
-
Cut (1) $2.5″ \times 6.5″$ rectangle
-
Cut (1) $2.5″ \times 8.5″$ rectangle
-
-
Fabric F (Light Yellow):
-
Cut (1) $2.5″ \times 8.5″$ rectangle
-
Cut (1) $2.5″ \times 10.5″$ rectangle
-
-
Fabric G (Medium Aqua):
-
Cut (1) $2.5″ \times 10.5″$ rectangle
-
Cut (1) $2.5″ \times 12.5″$ rectangle
-
Step-by-Step Assembly Instructions
Prep Work
-
Mark Diagonal Lines: Draw a straight diagonal line from corner to corner on the wrong side of the Fabric A ($5″$) square and all four Fabric C ($4.5″$) squares.
Part 1: The Half-Square Triangle (HST) Center
-
Place the Fabric A ($5″$) square and Fabric B ($5″$) square right sides together.
-
Sew a $1/4″$ seam allowance along both sides of the drawn diagonal line.
-
Cut directly along the drawn line to create two HST units.
-
Open and press the seams toward the darker fabric. Trim and square up one of the units to exactly $4.5″ \times 4.5″$ (you will have one extra HST left over for another project).
Part 2: First Flying Geese Round (Fabric D)
-
Sew the $2.5″ \times 4.5″$ Fabric D rectangle to the right side of your center HST unit. Press the seam toward the rectangle.
-
Sew the $2.5″ \times 6.5″$ Fabric D rectangle to the top of the unit. Press toward the rectangle. Your piece should now measure $6.5″ \times 6.5″$.
-
Take one Fabric C ($4.5″$) square and place it right sides together on the top-right corner of the unit. The drawn line should run diagonally across the corner.
-
Sew a thread or two directly away from the marked line into the corner seam allowance (this leaves room for the fabric fold).
-
Fold the Fabric C square over to complete the triangle corner, press, and trim away the excess fabric layers underneath, leaving a $1/4″$ seam allowance.
Part 3: Second Flying Geese Round (Fabric E)
-
Sew the $2.5″ \times 6.5″$ Fabric E rectangle to the right side of your block. Press outward.
-
Sew the $2.5″ \times 8.5″$ Fabric E rectangle to the top of your block. Press outward. The block now measures $8.5″ \times 8.5″$.
-
Place your second Fabric C ($4.5″$) square on the top-right corner, aligning the diagonal line.
-
Sew, fold, press, and trim exactly as you did in Steps 9 and 10 to create the second “goose.”
Part 4: Third Flying Geese Round (Fabric F)
-
Sew the $2.5″ \times 8.5″$ Fabric F rectangle to the right side. Press outward.
-
Sew the $2.5″ \times 10.5″$ Fabric F rectangle to the top. Press outward. The block now measures $10.5″ \times 10.5″$.
-
Place your third Fabric C ($4.5″$) square on the top-right corner.
-
Sew, fold, press, and trim to form the third “goose.”
Part 5: Fourth Flying Geese Round (Fabric G)
-
Sew the $2.5″ \times 10.5″$ Fabric G rectangle to the right side. Press outward.
-
Sew the $2.5″ \times 12.5″$ Fabric G rectangle to the top. Press outward. The block now measures $12.5″ \times 12.5″$.
-
Place your final Fabric C ($4.5″$) square on the top-right corner.
-
Sew, fold, press, and trim to form the final “goose.”
Pressing Tip: For the flattest finish, ensure all your seam allowances are pressed outward (away from the central Half-Square Triangle unit) as you complete each round. Give the finished $12.5″ \times 12.5″$ unfinished block a final press with steam.