1. Material & Tool Requirements
-
Fabric: 8 different fabrics that create a gradient (from lightest to darkest, or a smooth color transition). Small-scale prints, batiks, tonal textures, or solid fabrics work best. Large-scale prints will look choppy when cut.
-
Yardage: Cut (5) $2.5″ \times \text{WOF}$ (Width of Fabric) strips from each of your 8 fabrics. (Alternatively, you can use 40 pre-cut $2.5″$ Jelly Roll strips).
-
-
Essential Tools:
-
Rotary cutter and cutting mat.
-
A long quilting ruler ($6″ \times 24″$).
-
A reliable seam ripper (this is your design tool for Bargello!).
-
A smartphone or camera.
-
2. Fabric Mapping & Preparation
Before sewing, you must organize your colors to create the dramatic movement Bargello is famous for.
-
Create a Fabric Map: Cut a small snippet of each of your 8 fabrics. Arrange them in a smooth color/value sequence.
-
Number Your Fabrics: Label them Fabric 1 (Lightest) through Fabric 8 (Darkest). Keep this map near your sewing machine as a reference.
3. Step-by-Step Assembly Instructions
Step 1: Constructing the Strip Sets
You will combine your strips into large panels.
-
Lay out one strip of each fabric in numerical order: 1, 2, 3, 4, 5, 6, 7, 8.
-
Place Fabric 1 and Fabric 2 Right Sides Together (RST). Sew them along the long edge using a precise $1/4″$ seam allowance.
-
Pro Tip (The Alternate Direction Rule): To prevent your panel from bowing or warping (becoming “banana-shaped”), alternate your sewing directions. If you sew Fabric 1 and 2 from top to bottom, sew Fabric 3 onto Fabric 2 from bottom to top.
-
Continue adding strips until all 8 fabrics are joined in order. Repeat this process until you have 5 identical strip sets.
-
Pressing: Press all the seam allowances in flat, alternating directions (e.g., Row 1 to the left, Row 2 to the right). This ensures your seams will “nest” perfectly later. Trim the selvages off the ends to square up your sets.
Step 2: Creating the Continuous Tubes
-
Take one completed strip set. Fold it in half, Right Sides Together, bringing the long edge of Fabric 1 directly against the long edge of Fabric 8.
-
Sew them together with a $1/4″$ seam allowance.
-
You now have a continuous fabric loop/tube with 8 vertical color rings. Repeat for all 5 strip sets.
Step 3: Sub-cutting the Slices (Varying Widths)
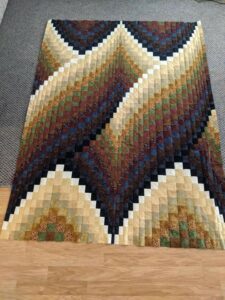
The optical illusion of a Bargello wave is created by slicing your tubes into columns of different widths.
Using your rotary cutter and ruler, cut the tubes at right angles to the seams into vertical rings. Cut the slices according to this sequence:
-
Slices 1 to 4: Cut exactly $3.5″$ wide. (Creates a slow, broad wave).
-
Slices 5 to 10: Cut exactly $2.5″$ wide. (Speeds up the wave).
-
Slices 11 to 18: Cut exactly $1.5″$ wide. (Creates a sharp, dramatic curve).
-
Slices 19 to 24: Cut exactly $2.5″$ wide. (Slows the wave back down).
-
Slices 25 to 28: Cut exactly $3.5″$ wide. (Stabilizes the design).
Note: Number or label your slices as you cut them to keep track of their widths!
Step 4: Strategic Unpicking (Creating the Wave)
Now, you will open your tubes back into flat vertical columns, but at shifting points. This is called “stepping.”
-
Column 1 ($3.5″$ wide): Use your seam ripper to unpick the seam between Fabric 8 and Fabric 1. Lay the strip flat on your design surface. Fabric 1 will be at the top.
-
Column 2 ($3.5″$ wide): Step up. Unpick the seam between Fabric 1 and Fabric 2. Lay it next to Column 1. Fabric 2 will now be at the top.
-
Column 3 ($3.5″$ wide): Step up again. Unpick the seam between Fabric 2 and Fabric 3. Lay it down. Fabric 3 is at the top.
-
Continue Shifting: Keep unpicking the next consecutive seam for each column. When you reach the top (Fabric 8), change directions and begin stepping down by unpicking backwards (e.g., unpicking between 7 and 8, then 6 and 7) to make the wave flow back down.
Step 5: Assembling the Quilt Top
-
Arrange all your unpicked columns side-by-side on your design floor or table.
-
Check Your Wave: Stand back and take a photo of the layout with your smartphone. Switching the photo to a Black & White filter is a great trick to verify that your gradient is flowing perfectly without mistakes.
-
Pin Column 1 and Column 2 Right Sides Together. Because you pressed your original strip sets in alternating directions, the intersecting seams will naturally lock (“nest”) into place.
-
Sew them together using a $1/4″$. Continue adding the columns across the quilt top one by one.
-
Give the finished quilt top a final, thorough press.
4. Helpful Tips for Bargello Quilting
-
Shorten Your Stitch Length: Drop your machine’s stitch length down to around $1.8\text{mm}$. Because you will be cutting across seams and ripping segments open, a shorter stitch length locks the threads in place and prevents the remaining seams from popping open.
-
Quilting Design: When it comes time to quilt the layers together, use a walking foot to trace and echo the natural flowing curves of your Bargello wave. This emphasizes the optical movement beautifully!